
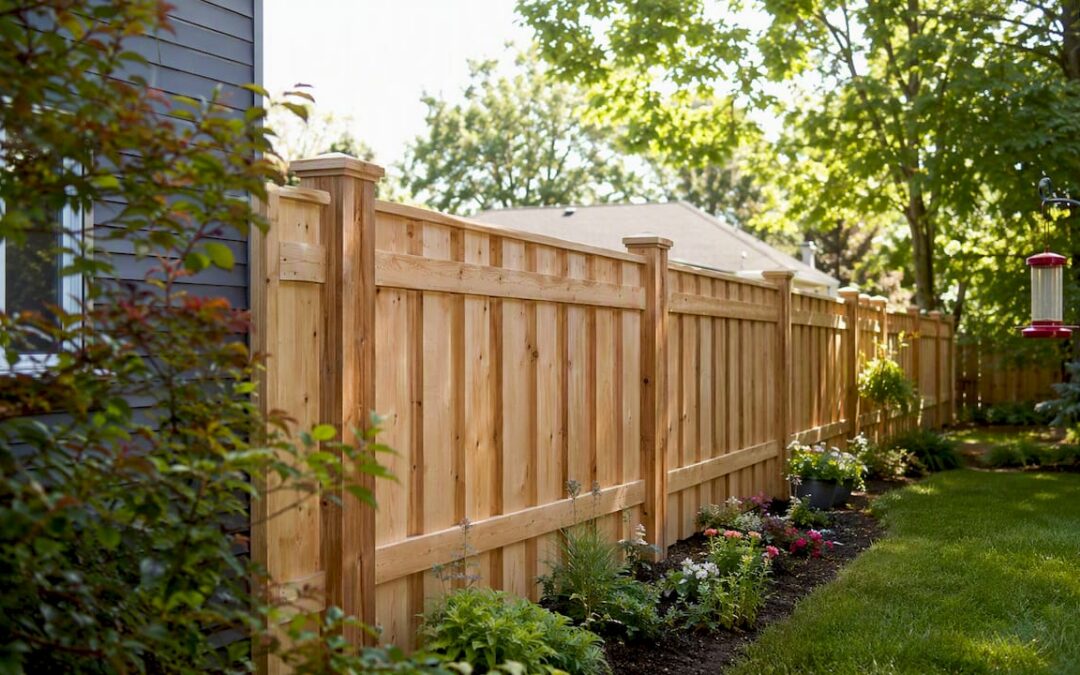
A good neighbor fence is a fence designed to look finished on both sides, so neither you nor the person next door gets stuck with the “ugly side.” Instead of rails and posts facing one neighbor while the clean boards face the other, a symmetric design gives both properties an equally presentable view. If you share a boundary with a neighbor, live in an HOA community, or simply want to avoid a dispute before it starts, a good neighbor fence is the right call. Before you break ground, two things matter most: a current property survey and a review of your local building codes and HOA rules.
Key Takeaways
A good neighbor fence solves the “good side / bad side” problem at the design stage, and getting the survey, permit, and neighbor agreement right before construction prevents the disputes that cost the most to fix.
| Point | Details |
|---|---|
| Design choice matters first | Shadowbox, board-on-board, and framed panel systems all produce a finished look on both sides; choose based on privacy needs and budget. |
| Survey before you build | A property survey confirms the line and determines whether the fence is solely yours or a shared structure with shared maintenance obligations. |
| Check codes and HOA rules | Local zoning, permit requirements, and HOA CC&Rs can restrict height, materials, and placement; verify before buying materials. |
| Document neighbor agreements | A written agreement recording cost split, maintenance schedule, and ownership protects both parties for the life of the fence. |
| Modernfence for professional installs | Modernfence serves Western Arkansas and Eastern Oklahoma with licensed, insured installation and written estimates for wood, vinyl, iron, and composite fences. |
Table of Contents
- Why the “good side / bad side” problem happens with standard fences
- Common good neighbor fence designs and how to choose between them
- What material should you use for a good neighbor fence?
- Ownership, property lines, permits, and HOA rules to check before you build
- Practical installation methods to get a finished look on both sides
- Typical timeline and ballpark costs for a good neighbor fence project
- How to approach your neighbor, negotiate cost-sharing, and document agreements
- When to hire a fencing contractor and what to ask one
- The case for spending a little more up front
- Modernfence handles good neighbor fence projects in Western Arkansas and Eastern Oklahoma
- Sources
Why the “good side / bad side” problem happens with standard fences
A standard privacy fence is built with vertical pickets nailed to horizontal rails, and those rails are attached to posts. The pickets create a smooth, clean face on one side. The other side shows the structural skeleton: rails running horizontally, post faces, and fastener heads. That exposed side is what contractors call the “back” of the fence, and it is almost always less attractive.
Whoever ends up looking at the back of the fence has a legitimate complaint. The structural side can also trap moisture and debris more easily, which speeds up rot in wood fences. Beyond aesthetics, this creates real friction:
- Neighbor complaints about an unattractive view from their yard or street
- HOA violations where covenants require the finished side to face outward; some municipal codes and HOA rules explicitly require the “good” side to face neighbors or the street
- Maintenance disputes over who is responsible for the structural side when the fence sits on the property line
- Resale friction if a buyer’s inspector or appraiser notes a fence that violates local codes
The root cause is simple: standard panel construction is one-sided by design. A good neighbor fence solves this at the construction stage rather than after the complaints arrive.
Common good neighbor fence designs and how to choose between them
There are four designs that reliably produce a finished look on both sides. Each one handles the rail-and-post problem differently, and the right choice depends on your budget, privacy needs, and how much maintenance you want to commit to.
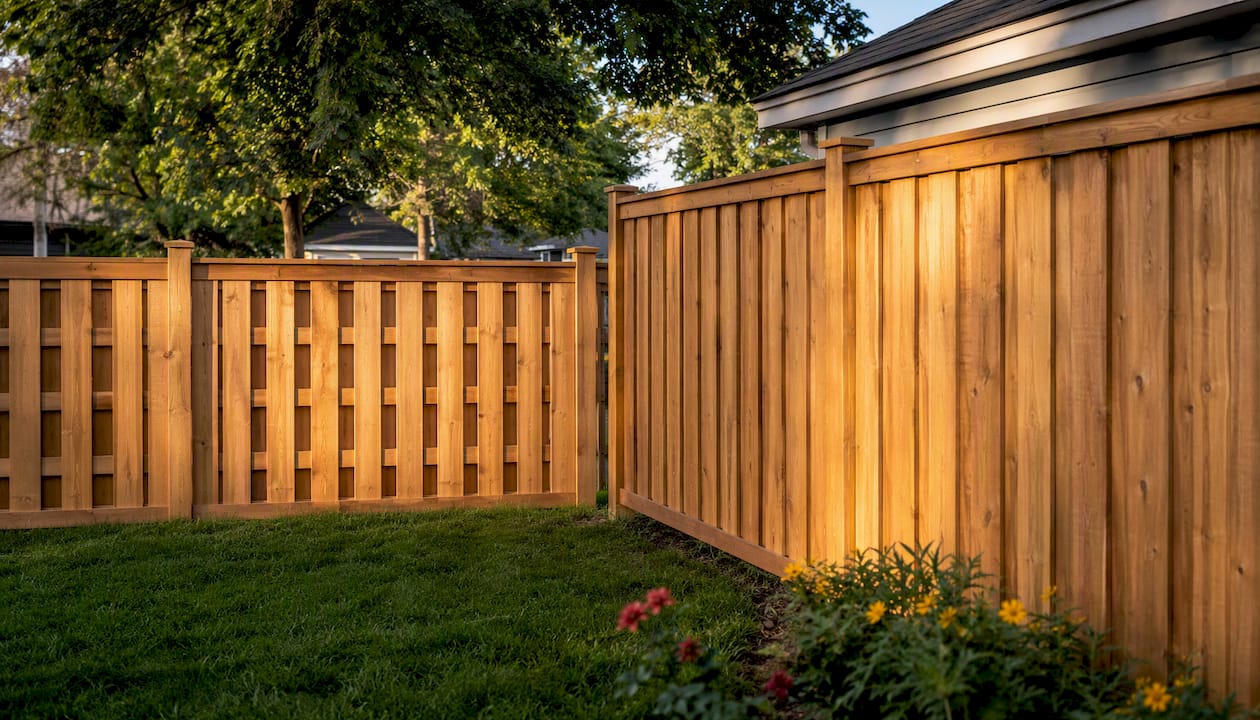
Shadowbox (alternating picket): Pickets alternate on opposite sides of the rail, so each side shows a mix of picket faces and narrow gaps. Privacy is not total, but airflow is better and the visual weight is lighter. This is the most popular good neighbor design for residential yards.
Board-on-board (overlapping pickets): Pickets overlap slightly on alternating sides of the rail, giving full privacy while still presenting a finished face on both sides. It uses more lumber than shadowbox, which raises material cost, but the result is a solid, dense fence with no sightlines through it.
Double-sided panels: Pre-built panels with pickets on both faces and a structural core in the middle. Installation is faster because panels arrive ready to hang, but the panels are heavier and the upfront material cost is higher. Best for homeowners who want a consistent, factory-finished look.
U-channel / framed systems: Metal or composite channels hold pickets or slats in a frame, so both sides show the same framed face. Common in vinyl and composite fencing. The frame itself becomes the visual element, and there are no exposed rails or posts to worry about. Maintenance is minimal.
| Design | Appearance (both sides) | Privacy level | Typical cost | Maintenance | Durability | Installation complexity |
|---|---|---|---|---|---|---|
| Shadowbox | Finished, open gaps | Moderate | Lower | Moderate | Good | Low |
| Board-on-board | Finished, solid | High | Moderate | Moderate | Good | Low–moderate |
| Double-sided panels | Finished, uniform | High | Higher | Low–moderate | Very good | Moderate |
| U-channel / framed | Finished, framed look | High | Higher | Low | Excellent | Moderate–high |
- Shadowbox works well when you want good looks on a budget and full privacy is not the priority.
- Board-on-board is the go-to for full privacy with a traditional wood appearance.
- Double-sided panels suit homeowners who want a quick, consistent install with minimal site work.
- U-channel systems are the best long-term choice for low maintenance, especially in vinyl or composite.
Pro Tip: If budget is tight, shadowbox gives you the best cost-to-appearance ratio. If you expect the fence to last 20-plus years with minimal upkeep, spend the extra money on a framed vinyl or composite system.
What material should you use for a good neighbor fence?
Material choice shapes how your fence looks from both sides, how long it lasts, and how much work you put in each year to keep it that way.
Wood is the most common choice for residential good neighbor fences. Cedar and pressure-treated pine are the standard options. Cedar resists rot and insects naturally; pressure-treated pine costs less upfront. Wood requires staining or sealing every 2–3 years to maintain appearance and prevent moisture damage. A well-maintained wood fence typically lasts around two decades. The natural variation in grain and color gives it a warm, traditional look that reads well on both sides when built with a shadowbox or board-on-board design. For more on privacy-focused wood designs, the options are broader than most homeowners expect.
Vinyl requires almost no maintenance beyond an occasional wash. It does not rot, warp, or need painting. Vinyl fencing is available in framed panel systems that look identical on both sides straight out of the box, making it one of the cleanest choices for a good neighbor application. Lifespan runs 20–30 years. The tradeoff is a higher upfront cost than wood and a look that some homeowners find too uniform.
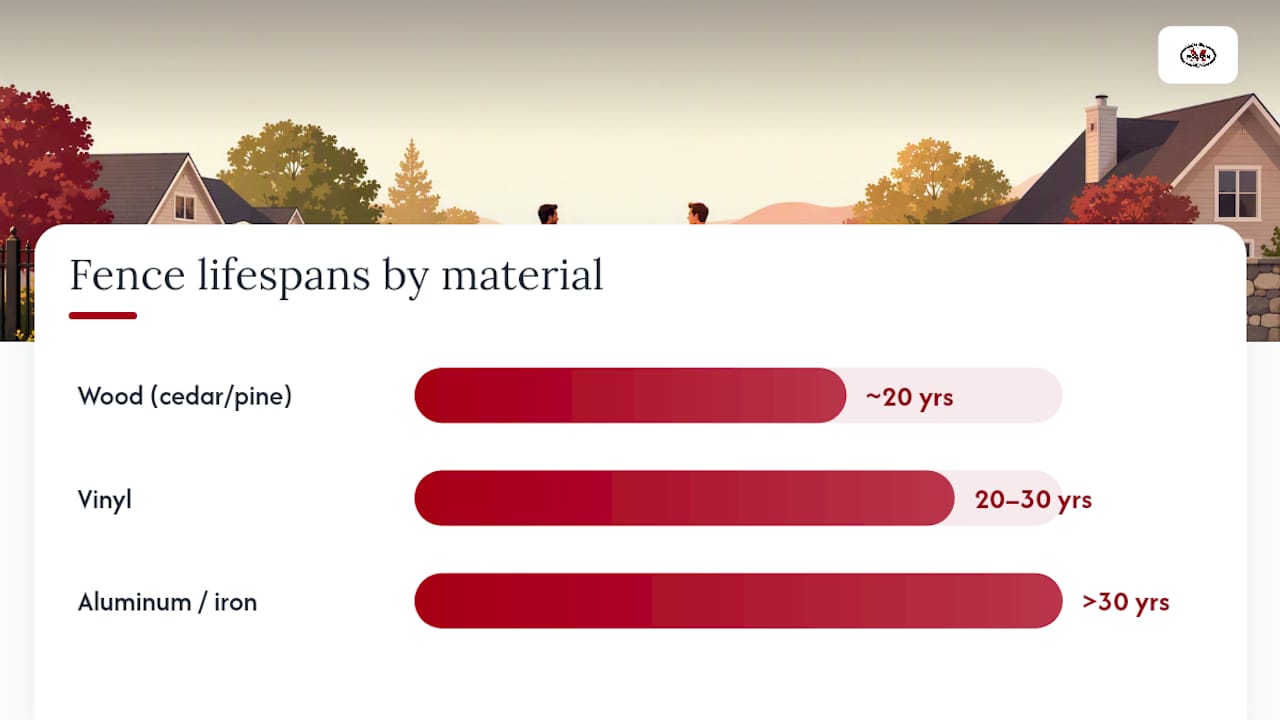
Aluminum and iron are naturally symmetric because the structural members are visible on both sides by design. Aluminum is lightweight and rust-resistant; iron is heavier and more substantial but requires periodic painting to prevent rust. Neither provides full privacy on its own, so they work best as decorative boundary markers rather than privacy screens. Lifespan for quality aluminum or iron fencing can exceed 30 years with proper care.
Composite combines wood fiber and plastic to produce a material that looks like wood but behaves more like vinyl. It resists moisture, insects, and UV fading better than natural wood. Maintenance is minimal: rinse annually and inspect fasteners. Composite costs more than wood but less than premium vinyl systems, and it holds color well over time.
- Wood: stain or seal every 2–3 years; inspect posts annually for ground-contact rot
- Vinyl: wash with soap and water once or twice a year; inspect panel locks after storms
- Aluminum/iron: inspect paint or powder coat annually; touch up bare metal immediately to prevent rust
- Composite: annual rinse; check fasteners and frame connections every few years
Wood and composite require deliberate construction techniques (shadowbox, board-on-board) to achieve a symmetric look. Vinyl framed panels and metal fencing are symmetric by default.
Ownership, property lines, permits, and HOA rules to check before you build
Getting the legal side right before construction is the single most effective way to avoid a forced removal, a fine, or a neighbor dispute that outlasts the fence itself.
Legal ownership of a fence depends on where it sits relative to the surveyed property line. A fence built entirely inside your lot is yours alone: you pay for it, you maintain it, and your neighbor has no legal claim to it. A fence placed directly on the boundary is typically treated as a shared structure, which means both owners share maintenance obligations for the life of the fence unless a written agreement says otherwise.
Setbacks, easements, and HOA CC&Rs can prevent you from building on the line even when you want to. A utility easement running along your rear lot line may prohibit permanent structures entirely. HOA rules may set height limits, material restrictions, or color requirements that override your design preferences.
Here is the pre-build checklist every homeowner should complete:
- Order a property survey. A residential boundary survey is the most cost-effective protection against a misplaced fence. Survey costs vary by lot size and region, but the expense is far smaller than the cost of moving a fence after construction.
- Check local zoning and permit requirements. Many jurisdictions require a permit for fences above a certain height (commonly 6 feet). Call your municipal building department before buying materials. For a detailed walkthrough, the residential fence permit guide covers what to expect.
- Review your HOA CC&Rs. Architectural committees can reject materials, colors, or heights that conflict with community standards. Get written approval before construction, not after.
- Locate utility easements. Call 811 (the national “Call Before You Dig” line) to have underground utilities marked. Easements recorded in your deed may also restrict fence placement.
- Check state partition-fence statutes. Many states have partition-fence or “good neighbor” statutes that allow written notice to a neighbor and, in some cases, require cost sharing for a boundary fence. Procedures and notice periods vary by state. For homeowners in the service area, Arkansas fence laws covers the state-specific rules in plain language.
Pro Tip: If your fence will sit on the boundary, get a written neighbor agreement before construction. Record the fence type, height, cost split, and maintenance schedule. A pre-construction agreement is the best practical protection against long-term disputes, even where statutes exist.
Practical installation methods to get a finished look on both sides
Good preparation prevents the most common installation mistakes. Before any post goes in the ground, the sequence below keeps the project on track.
- Confirm the survey and mark the line. Use survey stakes or a string line to mark the exact boundary. Never rely on an existing fence or a neighbor’s assumption about where the line is.
- Call 811 and mark utilities. Underground gas, electric, and water lines can be within inches of where you plan to dig. This step is not optional.
- Set posts plumb and at consistent spacing. Standard post spacing for residential privacy fences is 6–8 feet on center. Posts should be embedded at a depth of roughly one-third of the total post length, with a minimum of 2 feet in the ground. In freeze-thaw climates, embed depth should reach below the local frost line to prevent heaving; in Western Arkansas and Eastern Oklahoma, that depth is typically 18–24 inches.
- Attach rails or frames. For shadowbox and board-on-board designs, run two or three horizontal rails between posts. For framed panel systems, attach the U-channel frame to the posts before inserting pickets or slats.
- Install pickets or panels using the chosen method:
- Shadowbox: alternate pickets on opposite sides of the rail, leaving a small gap between each
- Board-on-board: overlap pickets on alternating sides, nailing each to the rail
- Double-sided panels: hang pre-built panels in post brackets
- U-channel / framed: slide pickets or slats into the channel frame
- Fasten and finish. Use galvanized or stainless fasteners to prevent rust staining on wood. Cap posts to shed water. For wood fences, apply stain or sealant within 30 days of installation. For a full step-by-step reference, the fence installation guide covers lasting-results practices in detail.
For yard preparation before the crew arrives, the 8-step yard prep checklist walks through clearance, gate planning, and utility marking in sequence.
Typical timeline and ballpark costs for a good neighbor fence project
Fence costs vary by material, design, linear footage, and local labor rates. The ranges below reflect typical residential projects in the United States and should be treated as planning estimates, not fixed quotes.
Wood shadowbox or board-on-board fences generally run in the range of $20–$45 per linear foot installed, depending on lumber grade and regional labor costs. Vinyl framed panel systems typically cost more per linear foot due to higher material prices. Aluminum and iron fencing vary widely based on style and whether fabrication is custom or stock. Composite falls between wood and premium vinyl in most markets.
Permit fees, survey costs, and HOA review fees add to the total. A property survey, if you do not already have a current one, is an additional line item worth budgeting for separately. Always ask your contractor to break out materials, labor, permits, and cleanup as separate line items in the written estimate. A quote that bundles everything into one number makes it impossible to compare bids fairly.
- Permit lead time: 1–3 weeks in most jurisdictions; some municipalities process same-day for simple residential fences
- Construction time: 1–3 days for a typical residential project (100–200 linear feet); longer for complex grading or custom materials
- Curing and finishing: wood stain or sealant needs 24–48 hours to cure before the fence is exposed to heavy rain
- State notice period: if your fence is on the boundary, your state’s partition-fence statute may require written notice to your neighbor 30–60 days before construction; check your state’s specific requirement
Red flags in a contractor quote: no written estimate, no permit line item when a permit is required, no mention of a survey, and no warranty on labor or materials. A contractor vetting checklist covers the questions to ask before signing anything.
How to approach your neighbor, negotiate cost-sharing, and document agreements
The conversation with your neighbor is often the part homeowners dread most. A straightforward, early approach almost always goes better than waiting until the fence is half-built.
Industry best practice is to communicate early and document agreements in writing. Even a neighbor who declines to share costs may accept the design if consulted. That acceptance alone prevents the most common post-construction complaints.
Practical outreach steps:
- Give written notice before construction, even if your state does not require it. A simple letter or email stating your intent, the proposed fence type, and the timeline is enough.
- Share a copy of the property survey and at least one written contractor estimate. This shows you have done the homework and are not guessing at the property line.
- Offer two or three design options and give your neighbor a reasonable response window (10–14 days is fair).
- If cost-sharing is on the table, note that courts generally limit recoverable fence costs to a “reasonable” fence for the area; you cannot compel a neighbor to pay for upgrades that exceed typical neighborhood standards.
What a written agreement should record:
- Who owns the fence (sole or shared)
- The agreed fence type, height, and material
- Cost split and payment schedule
- Maintenance responsibilities for each side
- Replacement or repair plan if the fence is damaged
- What happens if one owner sells the property
Pro Tip: Have both parties sign and date the agreement, and keep a copy with your property records. If the fence sits on the boundary, when neighbors disagree, written records of survey, permit, and agreement are the primary evidence in mediation or small-claims proceedings.
If your neighbor refuses to engage, check your state’s partition-fence statute for formal notice procedures. Most states allow you to proceed after the statutory notice period expires, even without neighbor participation. Mediation through a local community dispute resolution center is a low-cost option before escalating to small claims or civil court.
When to hire a fencing contractor and what to ask one
Some fence projects are straightforward enough for a confident DIYer. Others carry enough legal, structural, or logistical complexity that hiring a licensed contractor is the right call.
Hire a professional when:
- The fence will sit on or near the property line (boundary disputes are expensive)
- The lot has significant grade changes or drainage issues
- A permit is required and you are unfamiliar with the local process
- The design involves custom materials, metal fabrication, or framed panel systems
- You want a warranty on both materials and labor
Contractor vetting checklist:
- Licensed and insured in your state (ask for proof, not just a claim)
- Local references you can actually call
- Written estimate with line-item breakdown (materials, labor, permits, cleanup)
- Clear timeline with start and completion dates
- Warranty terms in writing
- Confirmation that they will handle or assist with the permit application
- Willingness to review the property survey before setting posts
A site visit before the estimate is a good sign. A contractor who quotes a job without seeing the lot, the grade, and the access points is guessing at the price. For homeowners in Eastern Oklahoma, the Oklahoma homeowner’s contractor guide covers local contractor selection in detail.
If you are unsure whether to repair an existing boundary fence or replace it entirely, the fence repair vs. replace guide helps you work through that decision before committing to a full project.
The case for spending a little more up front
The “good side / bad side” problem is almost always cheaper to solve at the design stage than after the fence is built. A shadowbox or board-on-board design adds modest material cost compared to a standard one-sided fence. A property survey adds a few hundred dollars. A written neighbor agreement costs nothing but an hour of your time.
What those investments prevent is harder to price: a neighbor who files an HOA complaint, a fence that has to be moved because it crossed the property line, or a maintenance dispute that runs for years because nobody wrote down who owns what. In my experience reviewing fence projects from planning through completion, the homeowners who skip the survey or the neighbor conversation to save time almost always spend more later, either in legal fees, contractor call-backs, or the cost of rebuilding a fence in the wrong place.
A symmetric design also holds its value better. A fence that looks good from both sides is easier to sell around when you list the property, and it rarely generates the kind of neighbor friction that shows up in disclosure documents. Spending slightly more on the right design and the right process is not a luxury. It is straightforward risk management.
Modernfence handles good neighbor fence projects in Western Arkansas and Eastern Oklahoma
Modernfence has been installing residential and commercial fences across Western Arkansas and Eastern Oklahoma for more than 70 years. When you need a boundary fence that looks right from both sides, the team handles the details that matter most: coordinating with your survey, pulling the permit, and building to a finish that satisfies both you and your neighbor.
Wood, vinyl, iron, and composite installs are all in the portfolio, and every project starts with a site visit and a written, line-item estimate. No bundled quotes, no guesswork on the property line. For wood good neighbor fences specifically, the wood fence installation service covers the full process from post-setting to final stain. If you want to see the full range of installation options, the fence installation guide is a good starting point. Call Modernfence or submit a contact form at Modernfence to schedule your free estimate.
Sources
These resources give you authoritative answers for your specific jurisdiction. No single website replaces a call to your local building department or a review of your recorded deed.
- Fencing laws and your neighbors: FAQs – FindLaw
- Property line & fence rules – Redfin
- Realtor
- How to split the cost of a fence with your neighbor – LegalClarity
- Which side of the fence is my responsibility? – LegalClarity
- Property boundaries, lines, and neighbors – FindLaw