
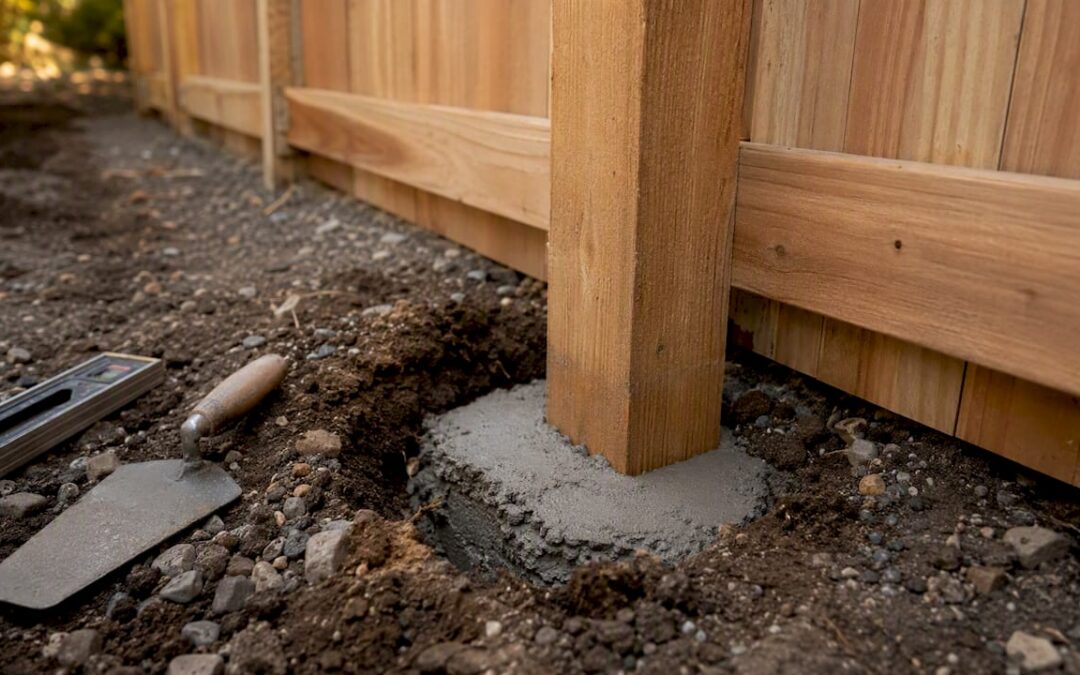
The best wind resistant fence is not the heaviest or the most solid. Chain link, shadowbox, and slatted designs outperform solid panels in most storm scenarios because they let wind pass through rather than fight it. When a solid face is required, an engineered steel-frame system is the right call. Either way, the single factor that determines whether your fence survives a major storm is the post-to-ground connection. Get that wrong, and no panel material will save it.
Non-negotiable specs at a glance:
- Post embedment: Minimum deep enough for substantial stability in hurricane-exposed zones; deeper embedment required for taller fences or sandy/loose soils
- Footing diameter: 10"–14" depending on wind zone; bell-bottom shape in loose soils
- Concrete: 3,000 PSI minimum; crown the top to shed water
- Post spacing: 6 feet on center for solid panels in high-wind zones; 8 feet acceptable for open designs
- Gate posts: One size larger than line posts; set deeper; use drop bolts and self-latching hardware
- Solid panels: Acceptable only when posts and footings are scaled up to match the increased load
Pro Tip: Photograph every post hole before the concrete pour. That single step protects your warranty, supports insurance claims, and satisfies most permit inspectors.
Table of Contents
- How do common fence materials hold up in strong winds?
- What design choices actually reduce wind load on your fence?
- What are the right post and footing specs for hurricane-prone areas?
- When do you need a permit for a wind resistant fence?
- How should you inspect and maintain a fence after a storm?
- When should you hire a professional fence contractor?
- Key Takeaways
- A contractor’s view on what actually fails in storms
- Modernfence builds fences that hold up when it matters
- Useful sources and further reading
How do common fence materials hold up in strong winds?
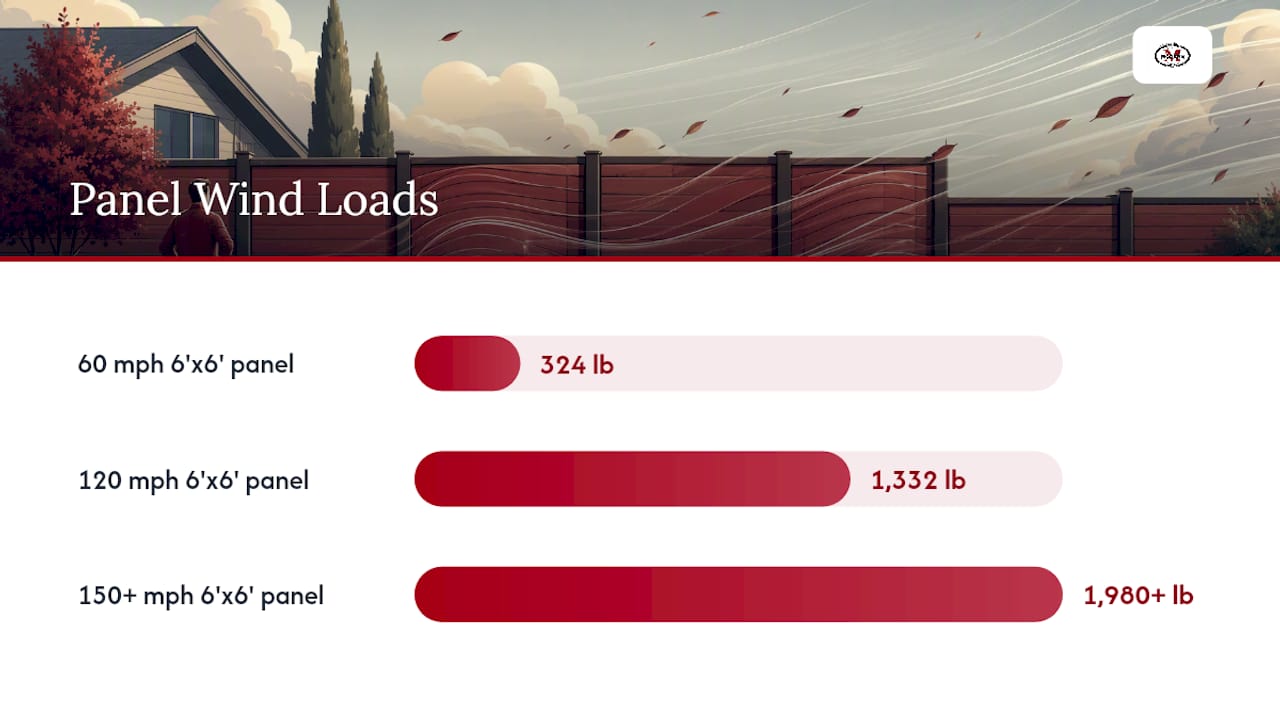
Wind load is not a fixed number. A 6’x6’ solid panel at 60 mph faces roughly 324 lbs of force; at 120 mph that same panel absorbs approximately 1,332 lbs; at 150+ mph the load exceeds 1,980 lbs. The material and design you choose determines how much of that force transfers directly to your posts.
| Material / Style | Wind Resistance | Typical Failure Mode | Relative Cost | Maintenance | Best Use Case |
|---|---|---|---|---|---|
| Chain link | Excellent (open mesh passes wind) | Debris puncture; fabric detachment at terminal posts | Low | Low | Perimeter, coastal, industrial |
| Aluminum ornamental | Very good (open picket design) | Gate hardware; picket bending at high gusts | Medium | Very low | Coastal, decorative, HOA |
| Shadowbox / semi-private wood | Good (15%–50% open area) | Rail splitting; post rot at grade | Medium | Medium | Residential privacy on exposed runs |
| Solid vinyl | Moderate without reinforcement | Post snap at grade; panel blow-out | Medium | Low | Sheltered residential only |
| Solid wood | Moderate | Post rot; rail failure; panel racking | Low–Medium | High | Inland sites with moderate wind |
| Engineered steel frame | Highest tested ratings | Fastener fatigue if improperly installed | High | Low | Hurricane zones, commercial, solid-face requirements |
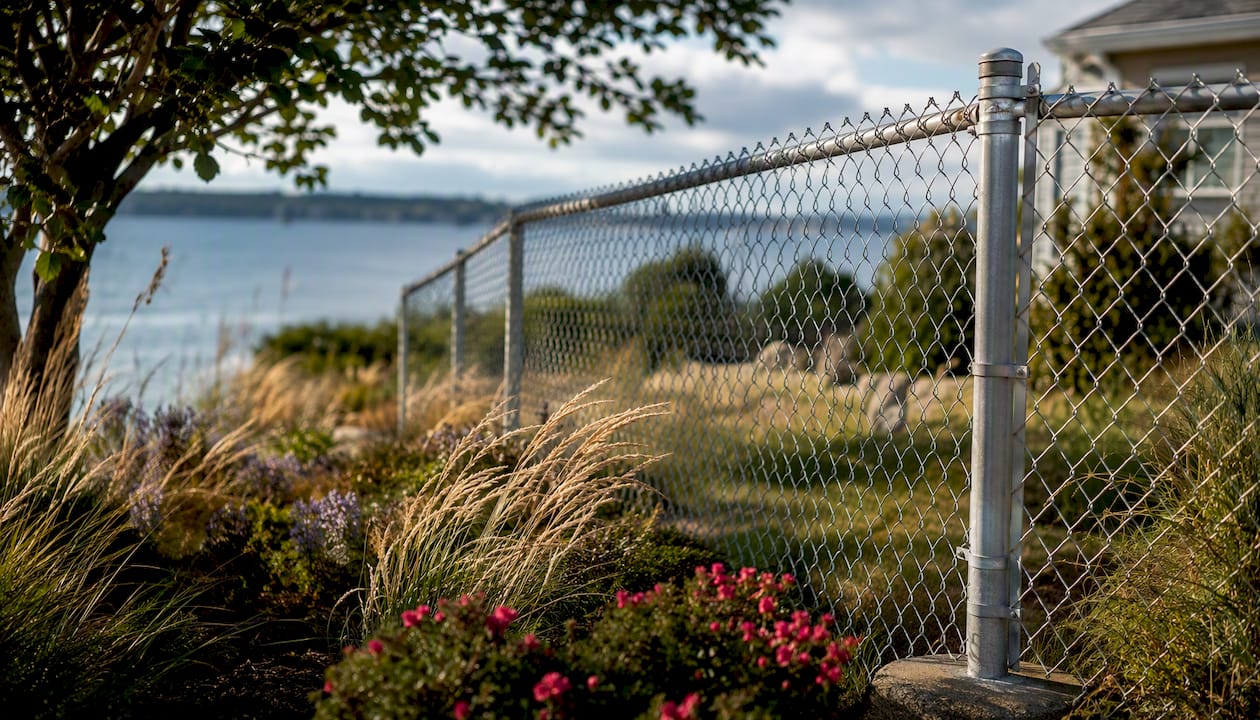
Chain link
Chain link fences reduce wind load significantly compared to solid panels because the open mesh lets air pass through with minimal resistance. Failures in storms usually come from flying debris tearing the fabric, not from wind pressure itself. For coastal or hurricane-prone sites, specify Class 3 galvanized fabric and SS40 steel posts set in concrete at least 36" deep.
Aluminum ornamental
Open-picket aluminum performs well because the gaps between pickets shed wind pressure the same way chain link does. The weak points are gate hardware and the picket-to-rail connection at sustained high gusts. Aluminum also resists corrosion, which makes it a practical choice for coastal properties where salt air degrades steel faster.
Solid vinyl and solid wood
Both materials face a physics problem: a solid face acts like a sail. Dynamic wind testing on vinyl privacy fence assemblies showed that unreinforced vinyl posts fail well before the panels do. Specimens that passed high-wind acceptance used aluminum reinforcements inside the posts and rails. Without that internal reinforcement, solid vinyl is not a reliable choice for exposed sites.
Solid wood has more natural flex than vinyl, which gives it slightly better energy absorption, but post rot at grade remains the primary long-term failure mode. Three rails instead of two, pressure-treated lumber, and proper post embedment extend service life considerably. For detailed wood-specific installation steps, wood fence installation best practices cover post sizing and rail requirements for wind-prone sites.
Engineered steel-frame systems
Engineered modular steel-frame systems distribute wind loads across a rigid frame and can be tested to exceed 150 mph when paired with properly sized posts and ASTM E330 testing protocols. One independently tested aluminum privacy specimen sustained a maximum wind load equivalent to a 130 mph test wind, with a calculated 3-second gust of approximately 147 mph. That kind of performance requires the full system: engineered frame, correct post schedule, and installation per the test report.
What design choices actually reduce wind load on your fence?
Wind-smart fencing is often counterintuitive. The strongest long-run boundary is not the heaviest solid wall but a structurally sound, slightly permeable system that bleeds pressure rather than absorbing it. Semi-open designs such as shadowbox, slatted, and hit-and-miss panels reduce wind load by 15%–50% depending on gap ratio, and they still deliver meaningful privacy.
Panel width, height, and run layout
Shorter panel spans reduce the load each post must carry. Dropping from 8-foot to 6-foot post spacing on a solid panel in a high-wind zone meaningfully cuts the bending moment at the base. On long runs, mixing a permeable bay every 30–40 feet breaks up turbulence and prevents pressure from building along the full length of the fence.
Stepping fence height down at corners also helps. A fence that drops 6 inches at each corner change of direction catches less wind at the transition point, where pressure tends to concentrate.
Gate design
Gates are the most common single-point failure in wind events. Inexpensive hardware is a frequent weak link. Specify oversized posts (one size up from line posts), strap hinges or at least three hinge points on tall gates, a spring closer or self-latching latch, and a drop bolt that pins the gate to the ground when it is in the open position. A gate left open and unlatched in a storm acts as a lever against its own posts. For access control and gate hardware options, the panel design at the hinge and latch sides should match the permeability of the adjacent fence run.
Pro Tip: On a long solid-panel run facing prevailing winds, add one shadowbox or slatted bay near the midpoint. It costs almost nothing extra and can prevent the domino-style failure where one post going down pulls the next.
What are the right post and footing specs for hurricane-prone areas?
Post embedment is where most fence failures begin. Posts act as cantilever beams, and the post-to-ground connection is the primary failure point in storm conditions. Sizing that connection correctly is not optional in high-wind zones.
| Fence Height | Exposure | Min. Embedment | Footing Diameter | Concrete PSI |
|---|---|---|---|---|
| 6 ft | Standard residential | 28"–30" | 8"–10" | 3,000 |
| 6 ft | Hurricane / coastal zone | 36" | 10"–12" | 3,000 |
| 8 ft | Hurricane / coastal zone | 42" | 12"–14" | 3,000 |
| Any height | Sandy / loose soil | Add 6" to above | Bell-bottom required | 3,000 |
Bell-bottom footings are worth the extra digging in sandy or loose soils. The flared base resists the upward pull and rotation that straight-sided footings cannot. Crown the top of every footing slightly above grade so water drains away from the post rather than pooling around it.
For post sizing, 4×6 or 6×6 pressure-treated lumber is the minimum for solid wood panels in high-wind zones. Steel pipe should be Schedule 40 or heavier. Spacing solid panels at 6 feet on center in hurricane-exposed areas is standard; open designs can go to 8 feet. For a full walkthrough of residential fence post and spacing specs, the installation guide covers concrete mix, post diameter, and depth by fence type.
Installation checklist to photograph for warranty and insurance:
- Post holes before concrete (show depth with a tape measure in frame)
- Rebar or dowel placement inside the footing
- Concrete bag labels (confirm PSI rating)
- Post spacing measurement between adjacent posts
- Completed footing crowns at grade
When do you need a permit for a wind resistant fence?
Permit requirements vary by county and municipality, but the general rule in the U.S. is that fences over 6 feet tall almost always require a permit, and fences in designated hurricane or high-wind zones often require one regardless of height.
Miami-Dade NOA and the HVHZ
In Miami-Dade County’s High Velocity Hurricane Zone (HVHZ), certain fence components require a Notice of Acceptance (NOA) before installation. The NOA confirms that a product has been tested and approved for use in the most demanding wind conditions in the continental U.S. If you are installing in Miami-Dade or Broward County, ask your contractor for the NOA number for every major component.
Florida Building Code and IBC
The Florida Building Code (FBC) references wind-load requirements for structures in hurricane-prone zones and sets post sizing and embedment minimums that exceed standard residential practice. The International Building Code (IBC) provides the baseline framework most other states follow, with local amendments for coastal counties. Texas coastal counties and properties covered by the Texas Windstorm Insurance Association (TWIA) have their own wind-load documentation requirements; contractors working in those areas should confirm current TWIA standards before submitting permit applications.
What to include in your permit package
- Stamped engineering drawings or manufacturer test reports (Intertek or ASTM E330 results where applicable)
- Photo documentation of embedment depth and concrete placement
- Hardware labels and product data sheets for any NOA-required components
- Footing diameter and concrete PSI confirmation
Pro Tip: Ask your contractor to include wind-load specs, post embedment depths, and concrete PSI in the written contract. That language protects both parties and gives your insurance carrier the documentation it needs if a storm claim is filed.
How should you inspect and maintain a fence after a storm?
Routine maintenance prevents small problems from becoming storm-season failures. Post-storm inspection protects your investment and supports any insurance claim you need to file.
Routine maintenance checklist
- Tighten all exposed hardware (screws, rail brackets, hinge bolts) at the start of each storm season.
- Replace bent or cracked pickets before they create a stress point in the panel.
- Check post plumb with a level. A post that has shifted more than 1/2" from vertical needs attention before the next storm.
- Inspect the concrete crown at each post base. Cracks or settlement that allows water to pool around the post accelerates rot and corrosion.
- Clear vegetation from the fence base. Vines and overgrowth trap moisture and add wind load.
Post-storm inspection steps
- Safety first. Do not approach a leaning fence section until you confirm there are no downed power lines or unstable structures nearby.
- Photograph all visible damage before touching anything. Wide shots showing the full run, then close-ups of each failure point.
- Check for leaning posts. Measure the offset at the top of the post from a plumb line. More than 2" of lean on a 6-foot post typically means the footing has rotated or cracked.
- Test every gate for function. A gate that no longer latches or swings freely indicates post movement.
- Preserve damaged hardware, broken pickets, and any detached components. Insurance adjusters may request physical evidence.
A post that has leaned but whose footing is still intact can sometimes be reset by excavating around the base, plumbing the post, and repacking with fresh concrete. A post whose footing has cracked or whose base has rotted needs full replacement. Temporary bracing with 2×4 diagonal supports tied to stakes driven at 45 degrees can stabilize a section safely until a contractor arrives.
Pro Tip: When filing a storm damage claim, include your pre-installation photos alongside the post-storm damage photos. Adjusters respond better to claims that show the original spec and the departure from it. For guidance on documenting and filing storm damage claims, a structured approach to the claim process helps protect your payout.
When should you hire a professional fence contractor?
DIY installation is reasonable for low fences in sheltered locations. For anything in a high-wind or hurricane-exposed area, the risk of undersized footings or improper post spacing is too high to leave to guesswork.
Situations that require a professional
- Coastal or hurricane-zone exposure (any fence height)
- Solid panels taller than 5 feet on an exposed site
- Complex terrain with grade changes or rocky soil
- Gated entries requiring stamped engineering or permit approval
- Any installation where an NOA or ASTM-tested product is required by code
What a qualified installer will deliver
A competent contractor brings more than labor. Expect properly scaled posts and footings matched to your wind zone, product test documentation (Intertek or ASTM E330 reports where relevant), photo records of embedment and concrete placement, permit handling, and a written warranty. Modernfence provides installation documentation and photo records as a standard part of every project, which supports both permit inspections and future insurance claims.
Pro Tip: Ask every contractor for a photo from their last three installations showing the post holes before concrete. If they cannot produce one, that tells you everything about their documentation practices.
Key Takeaways
A wind resistant fence survives storms when permeable panel designs or engineered systems are paired with correctly sized, deeply embedded posts set in 3,000 PSI concrete.
| Point | Details |
|---|---|
| Post embedment is the deciding factor | Minimum 36" in hurricane zones for 6-foot fences; 42" for 8-foot or sandy soils. |
| Permeable designs outperform solid panels | Shadowbox, slatted, and hit-and-miss styles reduce wind load by 15%–50% while preserving privacy. |
| Engineered systems for solid-face requirements | Steel-frame systems tested to ASTM E330 can exceed 150 mph design targets when installed per spec. |
| Document every installation phase | Photograph post holes, rebar, concrete labels, and post spacing before the pour for insurance and permits. |
| Modernfence for professional installation | Modernfence serves Western Arkansas and Eastern Oklahoma with licensed, insured installation and full photo documentation. |
A contractor’s view on what actually fails in storms
The fences that come down in storms almost never fail because of the material. They fail because of what is underground. Undersized posts, shallow footings, and concrete mixed too thin are the three problems we see most often when we are called out after a weather event. A 4×4 post set 18" deep in dry-packed soil is not a fence in a hurricane zone. It is a temporary structure waiting for the right gust.
Bell-bottom footings in sandy or loose soils are worth every extra minute of digging. The flared base resists the rotational pull that straight-sided footings cannot handle. We started photographing every post hole on every job years ago, not because a code required it, but because it is the only way to prove the work was done right after the fact. That protocol has resolved more than one insurance dispute quickly.
Gates deserve more attention than they usually get. We have seen $3,000 fence installations destroyed because a $15 latch failed and the gate acted as a sail against its own posts. Oversized gate posts, heavy-duty hinges, and a drop bolt are not upgrades. On an exposed site, they are the baseline.
If you are planning a fence in Western Arkansas or Eastern Oklahoma, the local design solutions and regional expertise that work here are different from what a national guide recommends. Soil conditions, wind exposure, and local code requirements all shape the right spec. Get the underground details right, and the fence above grade will take care of itself.
Modernfence builds fences that hold up when it matters
Seventy-plus years of installation experience across Western Arkansas and Eastern Oklahoma means Modernfence has seen what survives storms and what does not. The difference is almost always in the spec, not the price point.
Every Modernfence estimate includes an on-site assessment, measured post and footing specifications matched to your wind exposure, permit handling where required, and photo documentation of every installation phase. You get a written scope before work begins and a warranty backed by a licensed, insured contractor who has been doing this work in your region for decades.
If you are ready to install a fence that will still be standing after the next storm season, request your free estimate from Modernfence. For a closer look at what a professional installation covers from start to finish, the fence installation guide walks through every phase, from site prep to final inspection.
Useful sources and further reading
The claims and specifications in this guide draw from the following resources. Test data and engineering references are noted separately from practical installation guides.
Test data and engineering sources:
- Fence Wind Load: Engineering, Post Spacing & Design for High-Wind Areas | FenceCalc
- Dynamic wind load testing on 6 ft wide by 7 ft high aluminum privacy fence (Knotwood/Intertek-style report)
- The Architect’s & Contractor’s Guide to High-Wind Fence Engineering — FenceTrac
- How Much Wind Force Does a 6-Foot Fence Experience? — FenceTrac
- Fence Installation Guide for Lasting Results | Modern Fence Company
- Fences for Windy Areas: Designs, Types, Styles & Examples
- Privacy Fencing That Fits Your Property | Modern Fence Company
Practical installation and design guides:
- Modernfence: Fence Installation Guide for Lasting Results — Installer best practices covering photo documentation, three-rail requirements, gate post sizing, and permit handling.
- Modernfence: Privacy Fencing That Fits Your Property — Local installation examples and privacy fence options for homeowners assessing wind-resistance upgrades in Western Arkansas and Eastern Oklahoma.
Pro Tip: When reviewing test reports from Intertek or similar labs, confirm the specimen was built to the same post schedule and embedment depth you plan to use. A test result only applies when the installation matches the tested assembly.